For many iPhone owners, storage limitation is a reality: most of us have experienced running out of space at a crucial moment, whether the cause is apps, music, messages, or (most frequently) images and videos. Maybe while you were attempting to take pictures of a significant event, or maybe while you were attempting to update the operating system.
Sadly, internal storage on an iPhone cannot be upgraded. But fear not—assistance is on the way. In order to maximize every last megabyte of storage on your iPhone and make room for fresh apps and images, we’ve compiled our best advice in one article.
Please take note that although you cannot increase the internal storage on an iPhone, you can use iCloud storage to increase your storage to 2TB and you may complement its internal storage with external storage solutions.
Please to free up your iPhone storage, follow the following options till end:
1. Find out what is occupying space, then remove the largest offenders.
- Go to Settings.
- Proceed to General.
- Click or tap iPhone Storage.
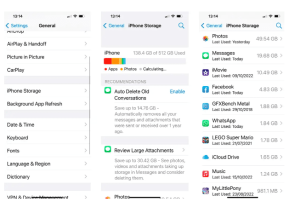
- This will lead you to a screen showing you what’s occupying your iPhone’s space. While it determines how much storage is being used and by whom, you will need to exercise patience. After some time, a bar chart with sections for photos, apps, messages, iOS, system data, and other file kinds will appear. Many people question how to erase Other or System Data on an iPhone since System Data, which was formerly known as Other in earlier iOS versions, may frequently take up tens of gigabytes of storage.
- You can see which of your apps is using up the most space by scrolling down, but we’ll go over the different storage management choices later.
In our instance, photos took up over 73GB and messages around 20GB. We will go over how to manage these apps and how much storage they have below.
You can easily find the apps that should be deleted by scrolling through the many ones taking up space; they are arranged with the bigger ones at the top. Apps that store media should be included in the figures, so you can anticipate seeing your messaging, music, and photo apps close to the top.
You may safely remove apps that you most likely won’t use anytime soon because this view also displays the date of your last app usage.
You can download the item again because it is linked to your Apple ID and Apple knows you own it. So don’t worry.
Go through the list with brutality. You can always download the software again for free if you’d like, but if it’s eating up 300MB of space and you don’t use it often, delete it.
- Find an app you want to delete.
- Swipe from right to left on it.
- Choose Delete App. Alternatively, you could choose Offload App, which will delete the app but keep any documents and data so that if you download it again you can access the data you had in it.
2. Delete apps from the Home screen
As previously said, you can quickly identify apps that consume a lot of space by navigating to Settings > General’s iPhone Storage section and reading through the list of apps. The apps are arranged by size and also display the date that you last used them.
You can swipe this screen from right to left to find the app you want to delete, and then select Delete App.
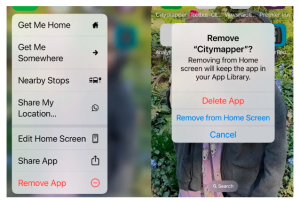
If you simply want to clear up some space quickly, there is an alternative method for doing so that might be a little faster. An app’s deletion is possible from the Home screen.
The iOS version you are using will determine how this functions.
- In the most recent iOS versions, press and hold on an icon until the menu comes up.
- Then tap Remove App.
- You’ll then see a window pop up to confirm you want to delete the app.
- Choose Delete App to remove it from your iPhone.
3. Work through Apple’s recommendations
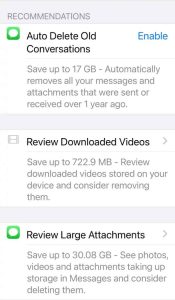
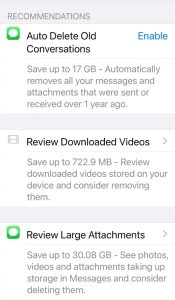
You may optimize your storage by following the suggestions found under Settings > General > iPhone Storage (above the list of apps). Most likely, you’ll notice a default of two in addition to the option to Show All, which will display more recommendations.
This is a terrific approach to manage storage going forward, but it’s not the fastest way to recover a small amount of storage when you need it quickly, which is why we didn’t start with it. Nonetheless, you will benefit much if you follow Apple’s guidance and implement the different storage management recommendations.
Using iCloud Photo Library is one option you will see here if you haven’t already set it up. Your pictures and videos will be saved on the cloud as a result. If you want to be able to access all of your images across all of your devices, iCloud Photo Library is a terrific option. Just make sure that Apple keeps optimized copies of the photos on your device instead of full resolution ones. In order to help you avoid falling into that trap, we will go into more depth about iCloud Photo Library below.
4. Delete app data and cache
Apple offers to remove the program and keep the data intact, but maybe you only want to erase the data. Perhaps there are books and old films on an app that you still wish to utilize but aren’t planning on seeing. It’s possible to remove a lot of data connected to certain apps without really removing the program.
Return to Settings > General > iPhone Storage and select an app by clicking the arrow next to it to see a more detailed view of the storage space that the app is using. In this manner, you can monitor how much data the software uses on its own and how much extra space documents and data take up.
The reason behind this is usually video program, but the way you may review downloaded videos above should have fixed it. Your video editing software and book reading apps, such as Kindle and Books, are additional places to look.
You must access the app itself in order to remove the data. Below, we’ll go over how to remove data from several apps, such as Notes, Messages, and Books. Additional locations to search are:
- Google Maps: Go to Saved and then look at Maps to see Maps data you have previously downloaded that you could delete.
- Prime Video/Netflix/Disney+ etc: Open the app and click to view your downloads. You should be able to select the ones you wish to delete.
Cached data from your browser can also be cleared to make space available. Take these actions to remove the Safari cache:
- Open Settings.
- Scroll down and click on Safari.
- Click on Clear History and Website Data.
You must clear the cache from within Chrome if you use it. If so, take the following actions:
- Open Chrome.
- Tap on Options.
- Tap Settings.
- Tap Privacy.
- Now tap on Clear Browser Data.
- Select what you want to delete.
- Tap Clear Browsing Data.
5. Delete text messages
As previously discussed, you have the option to have the Messages app automatically delete chats, which would free up a tone of storage. However, if you have sentimental messages that you would like to preserve, you might not want to do that.
You can still selectively remove messages from your phone that you don’t want to lose while mass-deleting the majority of the messages.
- Swipe from right to left on any message that you want to delete.
- Choose Delete.
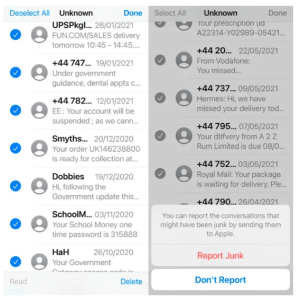
Filtering your messages by Unknown Senders is a more effective technique to remove messages that are safe to delete and then delete them all at once.
- Click on Unknown Senders.
- Once in the Unknown Senders view tap on the three dots at the top.
- Choose Select Messages.
- Tap on Select all.
- Double-check that you aren’t deleting anything you might need. Deselect those messages.
- Tap Delete.
- Open Settings.
- Scroll to Messages and tap.
- Scroll to Message History and tap on Keep Messages.
- Now choose between 30 days, 1 Year, and Forever.
6. Delete photos you don’t need
You might want to think about removing some of the images you don’t want to keep if they’re taking up a lot of space on your iPhone.
Maybe you frequently capture screenshots of train schedules throughout your commute, just like us. You may quickly remove screenshots from your phone by opening the Photos app, selecting Albums > Screenshots > Select > Select All (if you want to remove every screenshot, otherwise just the ones you want to remove).
Or you shoot a tone of pictures in an attempt to capture the ideal moment. These pictures don’t need to be kept. To make it easier for us to go back and remove a large number of photos in the future, we strive to develop the practice of deleting these additional photographs soon after we take them, or at the very least, we try to favoritise one of the collections.
If this isn’t your reasonable habit, there might be a free app that can assist you. Examine How to remove duplicate images from an iPhone.) We’ve used Remo Duplicate Photos Remover, a free alternative, but there are several more available, such the premium Duplicate Photos Fixer.
In a similar vein, your iPhone may be filled with hundreds of identical photos that you really don’t need if you’ve been utilizing Burst Mode.
To take more pictures out of the Burst Mode Locate the folder called Bursts, tap the image that appears, select it, choose which image or images you want to keep, hit Done, and then pick to keep only one favorite.
In relation to Burst Mode,
You can use a little longer shutter release time when taking a picture, and the camera will snap a burst of quick pictures. Burst mode is this. It’s excellent for capturing the perfect action photograph, however it can result in a large number of photos that need to be deleted later and is simple to accidentally activate.
Regretfully, Burst Mode cannot currently be turned off. Many have become dissatisfied by this; some claim that they can no longer control the shutter on their images, while others discover that burst mode quickly uses up all of their storage space.
It’s easier to take a picture with only one press if you use the volume control keys on the side of your phone instead of tapping the shutter button on the screen.

